What Does a Photoinitiator Do?
A photoinitiator does three jobs in UV curing:
- It absorbs UV or visible light at a specific wavelength.
- It generates free radicals or cationic species.
- It starts polymerization, turning monomers and oligomers into a cured coating, ink, adhesive, or resin part.
In production, a photoinitiator affects cure speed, tack-free surface, through-cure, yellowing, odor, adhesion, migration risk, and energy cost. The wrong photoinitiator can make a UV coating stay sticky, a white UV ink under-cure, an adhesive fail in the bondline, or a 405 nm 3D printing resin lose cure depth.
The Small Ingredient That Decides Whether Your UV Line Runs
A UV formula can look correct in the lab and still fail on the production line. I have seen buyers blame the lamp, resin, pigment, operator, or machine speed first. Many times, the real issue sits in a much smaller part of the formula: the photoinitiator.
That is the painful part. You may already have good oligomers, good monomers, and a stable UV lamp. But if the photoinitiator does not match your wavelength, film thickness, pigment load, or compliance target, the system will not cure as expected.
The practical answer is simple: a photoinitiator converts light energy into chemical reaction. Once you understand that job, you can choose photoinitiators with less guesswork, fewer failed batches, and better control over curing cost.

What Does a Photoinitiator Do in UV Curing?
A photoinitiator absorbs UV or visible light and creates reactive species. In most UV coatings, UV inks, UV adhesives, and SLA/DLP 3D printing resins, these reactive species are free radicals. They start polymerization in acrylate or methacrylate systems.
The UV curing process uses light energy to trigger polymerization. In free radical UV polymerization, the photoinitiator absorbs light, forms radical species, and those radicals react with acrylate groups.
Here is the process in factory language:
- The UV lamp or UV LED emits light.
- The wet coating, ink, adhesive, or resin receives that light.
- The photoinitiator absorbs light at a matching wavelength.
- The photoinitiator generates radicals or cationic species.
- Monomers and oligomers polymerize.
- The liquid layer becomes a cured solid.
This is why I treat the photoinitiator as the ignition system of UV curing. The resin is the fuel. The lamp is the energy source. The photoinitiator starts the reaction.
Why Is a Photoinitiator Necessary?
Most UV-curable acrylate systems do not cure fast enough with light alone. They need a chemical trigger. That trigger is the photoinitiator.
A photoinitiator is necessary because it connects three things:
- Light source
- Reactive resin chemistry
- Final cure performance
The photoinitiators formulation overview explains that photoinitiators absorb light at different wavelengths and form free radicals that initiate crosslinking and curing. That one sentence explains why buyers should never select photoinitiators by CAS number and price only.
A good photoinitiator package helps control:
- Cure speed
- Line speed
- Surface dryness
- Through-cure
- Adhesion
- Hardness
- Yellowing
- Odor
- Extractables
- Migration risk
- Energy use
- Batch repeatability
A poor match can create hidden cost. I have seen factories save a few dollars per kilogram on a photoinitiator, then lose far more through slower conveyor speed, rejected rolls, customer complaints, and urgent reformulation work.
Which Photoinitiator Problem Are You Trying to Solve?
Most buyers do not search “photoinitiator mechanism” for fun. They search because something is not curing, not printing, not bonding, or not passing QC.
Table 1: Buyer Search Scenario vs Practical Starting Point
| Search Scenario | What The Buyer Usually Means | First Check | Possible PI Direction |
|---|---|---|---|
| UV coating stays tacky | Surface cure problem | Oxygen inhibition, UV dose, PI dosage | 1173, 184, Type II package |
| White UV ink not curing | Pigment blocks UV | TiO₂ loading and film thickness | 819, TPO, 907 blends |
| Black UV ink cures slowly | Carbon black absorbs light | Lamp power and sensitizer package | 907, 369, ITX/DETX blends |
| 405 nm resin poor cure depth | LED mismatch or light screening | PI absorption at 405 nm | 819, TPO-L, TPO strategy |
| Clear coating turns yellow | Overdose or wrong PI type | Dosage, lamp energy, resin package | 1173, 184, TPO-L |
| UV adhesive bondline soft | Light cannot reach depth | Substrate transmission and bondline | 1173, TPO, 819 |
| Need photoinitiator supplier China | Sourcing and documents | COA, SDS, TDS, lead time | Request sample and compliance file |
This table is useful because it changes the question. The real question is not “What does a photoinitiator do?” The better question is: What curing problem should your photoinitiator solve?
Free Radical vs Cationic Photoinitiators
Photoinitiators usually support two main curing routes: free radical curing and cationic curing.
Free Radical Photoinitiators
Free radical photoinitiators are common in acrylate and methacrylate systems. These systems appear in UV coatings, UV inks, UV adhesives, overprint varnishes, electronics materials, and many 3D printing resins.
Common UVIXE product directions include:
- Photoinitiator 1173
- Photoinitiator 184
- TPO photoinitiator
- TPO-L photoinitiator
- BAPO Photoinitiator 819
- ITX
- DETX
- 907
- 369
A free-radical photopolymerization review shows why this reaction route matters in coatings, adhesives, dental materials, electronics, and additive manufacturing. For B2B buyers, the value is direct: free radical photoinitiators cure fast and fit many industrial UV systems.
Cationic Photoinitiators
Cationic photoinitiators generate acid or cationic species after light exposure. They often cure epoxy-type systems through ring-opening polymerization.
Cationic systems may offer:
- Lower oxygen inhibition
- Lower shrinkage in some systems
- Strong adhesion on selected substrates
- Dark cure after exposure
But they need different resin chemistry. If your formula is acrylate-based, do not assume a cationic photoinitiator will fix a curing issue.
Type I vs Type II Photoinitiators
Type I photoinitiators split directly after absorbing light. They generate radicals without needing a second molecule. 1173, 184, TPO, TPO-L, and 819 belong to this practical selection area.
Type II photoinitiators need a hydrogen donor or co-initiator. ITX and DETX often appear in UV ink systems because they help absorb longer wavelengths and support curing when paired with the right amine synergist or initiator package.
Table 2: Type I vs Type II Photoinitiators
| Type | How It Works | Common Strength | Common Risk | Typical Use |
|---|---|---|---|---|
| Type I | Cleaves directly after light absorption | Fast radical generation | May yellow or screen light if overused | Coatings, adhesives, resins |
| Type II | Reacts with co-initiator after absorption | Useful in pigmented systems | Needs correct synergist balance | UV inks, varnishes, blends |
This is why I never recommend a photoinitiator only from a product list. I need to know the lamp, resin, color, thickness, and end-use market.
Photoinitiator Selection Starts With Wavelength Match
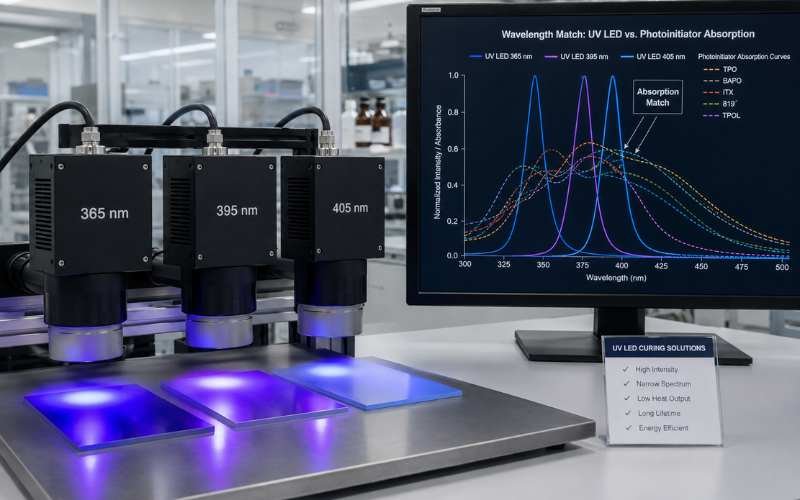
The first question I ask is: What wavelength are you using?
Photoinitiator selection starts with matching lamp emission to the photoinitiator absorption spectrum. If the photoinitiator does not absorb where the lamp emits, adding more dosage may not solve the problem.
Mercury lamps have broad UV output. UV LED systems are narrower, often 365 nm, 385 nm, 395 nm, or 405 nm. This difference changes the whole selection logic.
Table 3: UV Lamp Type vs Photoinitiator Selection Logic
| UV Source | Typical Wavelength Area | Buyer Risk | Better Selection Direction |
|---|---|---|---|
| Mercury lamp | Broad UV output | Heat, lamp aging, yellowing | 1173, 184, ITX/DETX blends |
| 365 nm LED | Narrow UV output | Under-cure if PI absorption is weak | 184, TPO, 819 depending formula |
| 385 nm LED | Medium-long UV | Surface and depth balance | TPO, TPO-L, 819 blends |
| 395 nm LED | Long UV LED | Weak cure with older PI systems | TPO-L, 819, TPO blends |
| 405 nm LED | Near-visible | Poor cure depth if mismatch exists | 819-led strategy, TPO/TPO-L blends |
If you use a 395 nm or 405 nm LED line, do not ask only for the cheapest 184 or 1173. Send your wavelength first. The wrong photoinitiator can look fine in a catalog and still fail under your lamp.
What Does a Photoinitiator Affect in Production?
A photoinitiator affects the parts of UV curing that factory managers, R&D teams, and procurement buyers care about most.
Cure Speed
Cure speed decides how fast your line can run. A good lamp-photoinitiator match may allow faster conveyor speed at the same UV dose. A poor match forces slower line speed, higher exposure, or more passes.
That becomes a direct production cost.
Surface Cure
Surface cure means the top layer becomes dry, hard, and tack-free. This matters in UV coatings, overprint varnishes, label inks, screen inks, and industrial protective coatings.
Poor surface cure can cause:
- Sticky surface
- Dust pickup
- Blocking during stacking
- Weak scratch resistance
- Residual odor
- Poor handling after cure
Oxygen inhibition often makes surface cure harder. A better photoinitiator package can help, but only after checking UV dose and formulation balance.
Through-Cure
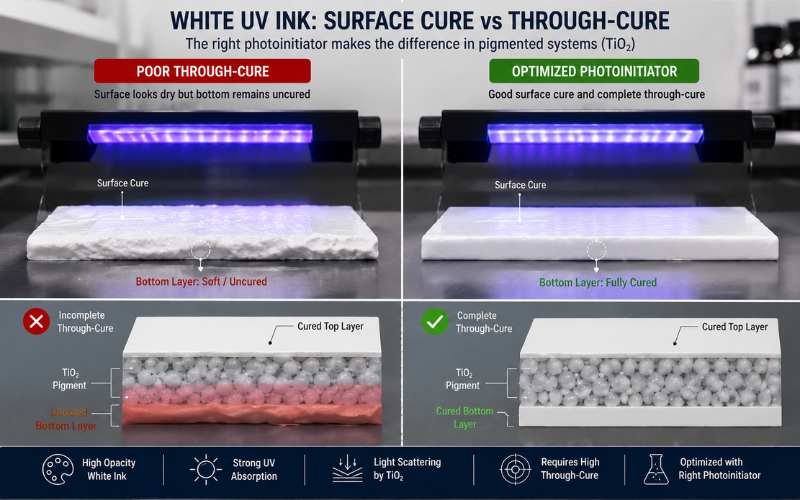
Through-cure means the lower part of the film, ink layer, adhesive, or resin part cures properly. Thick layers and pigmented systems need special attention.
White UV ink is a common example. Titanium dioxide scatters and blocks UV light. Black ink is even harder because carbon black absorbs strongly. If the photoinitiator cures only the top layer, the bottom stays soft.
In these cases, TPO vs 819 photoinitiator is often a useful comparison because phosphine oxide photoinitiators can support deeper cure in the right system.
Yellowing and Final Appearance
Yellowing matters in clear coatings, white inks, optical adhesives, electronics materials, and 3D printing resins. It may come from the photoinitiator, high dosage, overexposure, resin chemistry, or incomplete cure.
For clear systems, I often start the discussion around 1173, 184, or TPO-L, then test against the real lamp and substrate. If you are choosing between common clear coating grades, Photoinitiator 1173 vs 184 is a useful starting point.
Photoinitiator Dosage: More Is Not Always Better
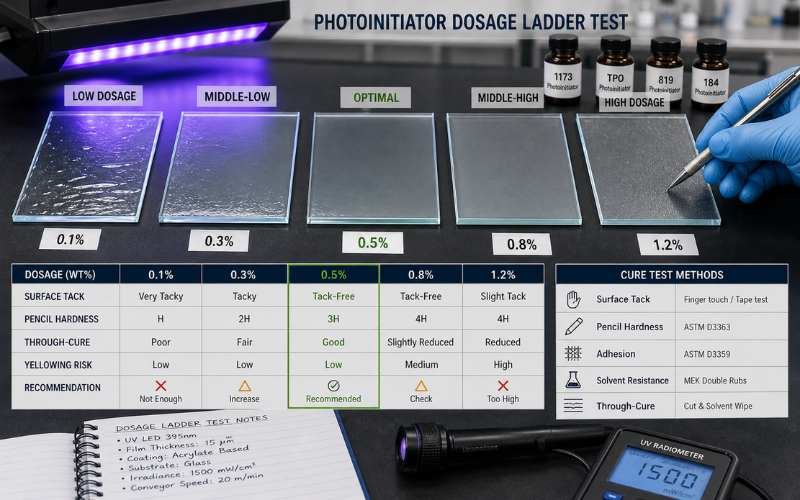
Many factories try to solve curing problems by adding more photoinitiator. Sometimes it helps. Often, it hides the real problem.
Too little photoinitiator can cause slow cure, tacky surface, weak adhesion, and low conversion. Too much photoinitiator can absorb too much light near the surface. This creates light screening and reduces through-cure.
A RadTech paper on photoinitiator effect on depth of cure studied how photoinitiator type and concentration affect surface tackiness and depth of cure in light-cured acrylate formulations. The practical lesson matches what I see in buyer testing: dosage changes must be tested, not guessed.
Table 4: Common Dosage Problems and Factory Symptoms
| Problem | Production Symptom | Likely Cause | Practical Check |
|---|---|---|---|
| Too little PI | Wet or tacky surface | Low radical generation | Increase stepwise in lab |
| Too much PI | Surface cures, bottom stays soft | Light screening | Reduce dosage or change PI |
| Wrong wavelength | No cure improvement | Weak absorption | Compare lamp output and PI spectrum |
| Pigment interference | White or black ink under-cures | TiO₂ or carbon black blocks light | Use deep-cure PI direction |
| Poor solubility | Specks or filter blockage | PI not dissolved | Pre-dissolve or consider liquid PI |
| Overexposure | Yellowing and odor | Too much energy or high PI | Lower dose or change PI package |
My rule is simple: never jump from one dosage to bulk production. Run a ladder test first.
A Practical Photoinitiator Selection Workflow
This is the workflow I use before giving a buyer a starting recommendation.
Step 1: Identify the Resin System
First, confirm whether the system is acrylate, methacrylate, epoxy, hybrid, or another chemistry. Most UV coating, UV ink, UV adhesive, and SLA/DLP resin buyers work with acrylate-based free radical systems.
Step 2: Confirm Lamp Type and Wavelength
Ask for mercury lamp, 365 nm LED, 385 nm LED, 395 nm LED, or 405 nm LED. The lamp decides which photoinitiator can absorb useful energy.
Step 3: Check Film Thickness or Bondline
A thin varnish and a thick adhesive bondline do not need the same cure strategy. Thick systems need stronger through-cure logic.
Step 4: Check Pigment or Filler Loading
Pigment changes everything. White, black, metallic, and filled systems need deeper analysis than clear systems.
Step 5: Define the End-Use Market
Food packaging, electronics, medical-related materials, toys, and EU-facing products need stricter document and compliance review. The OECD radiation curable coatings, inks, and adhesives report also shows why releases, use patterns, and exposure pathways matter in radiation-curable product chains.
Step 6: Run Sample Screening
Do not approve bulk material from a catalog page. Test samples in the real formula, on the real substrate, under the real lamp, at the real line speed.
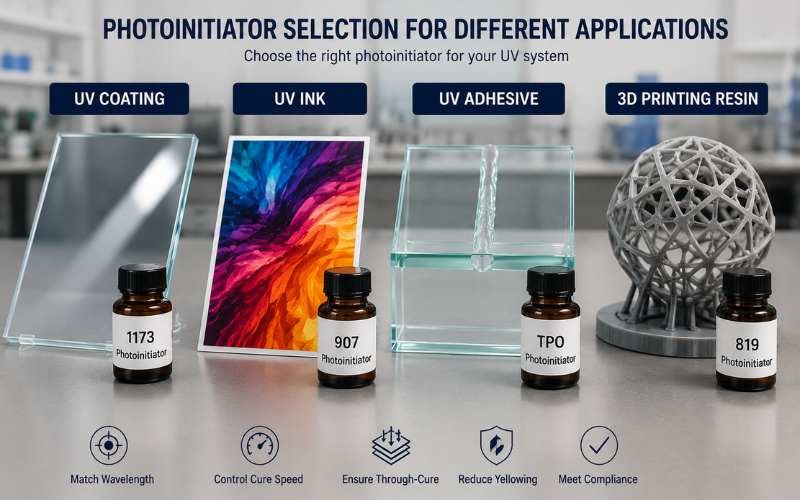
Application-Based Photoinitiator Selection
Photoinitiator for UV Coatings
For UV coating photoinitiator, buyers usually care about hardness, adhesion, clarity, yellowing, and line speed.
Clear wood coatings often need low-yellowing systems. Plastic coatings need adhesion without damaging the substrate. Industrial coatings may need fast cure and chemical resistance.
Common starting directions:
- 1173 for clear coatings and fast cure
- 184 for good reactivity and surface cure
- TPO-L for lower yellowing and LED-friendly systems
- 819 for thicker or pigmented coatings
A practical lesson: if a clear coating yellows, do not blame the photoinitiator alone. Check dosage, UV dose, resin package, and film thickness together.
Photoinitiator for UV Inks
For UV ink photoinitiator, pigment is the main challenge. Pigments compete with photoinitiators for UV energy.
White UV ink often needs deep-cure support because titanium dioxide blocks and scatters light. Black UV ink is even harder because carbon black absorbs strongly.
For UV ink buyers, I check:
- Pigment color
- Pigment loading
- Ink film thickness
- Printing speed
- Substrate
- Lamp wavelength
- Odor target
- Migration requirement
A study on migration of photoinitiators used in printed food packaging examined photoinitiators such as Irgacure 184, Irgacure 907, ITX, and others in food simulants. If your ink enters packaging markets, migration cannot be treated as an afterthought.
Photoinitiator for UV Adhesives
For UV adhesive photoinitiator, the cure path is often harder than it looks. Light may need to pass through glass, plastic, or a narrow bondline.
Common buyer concerns include:
- Bondline thickness
- Substrate transparency
- Shadow areas
- Final bond strength
- Yellowing
- Odor
- Storage stability
- Electronics or optical requirements
In adhesive projects, I ask for substrate details early. A photoinitiator that cures well in an open film may fail inside a thick or blocked bondline.
Photoinitiator for 3D Printing Resin
SLA and DLP 3D printing resins depend heavily on LED wavelength. Many systems use 385 nm or 405 nm. A small absorption mismatch can change cure depth, green strength, and print resolution.
A good 3D printing resin photoinitiator should support:
- Stable cure depth
- Controlled layer formation
- Low yellowing for clear or light-color resins
- Good solubility
- Acceptable odor
- Consistent batch quality
TPO, TPO-L, and 819 can all appear in 3D printing resin discussions. The right direction depends on wavelength, resin color, exposure energy, and compliance target.
Quick Selection Matrix for Procurement and R&D
Table 5: Photoinitiator Selection Matrix by Application
| Application | Main Problem | Typical PI Direction | Buying Note |
|---|---|---|---|
| Clear UV coating | Yellowing and hardness | 1173 / 184 / TPO-L | Ask for low-color batch data |
| White UV ink | TiO₂ blocks UV | 819 / TPO / 907 blends | Test real pigment loading |
| Black UV ink | Carbon black absorbs UV | 907 / 369 / ITX/DETX package | Check surface cure and odor |
| UV adhesive | Bondline cure | 1173 / TPO / 819 | Test substrate transmission |
| 3D printing resin | LED match and cure depth | TPO-L / 819 / TPO | Match 385/405 nm |
| Label printing | Odor and migration | Low-migration package | Request compliance documents |
| Industrial coating | Speed and resistance | TPO / 819 / 184 blends | Check line speed and UV dose |
This matrix is not a final formula. It is a screening tool. R&D still needs lab testing. Procurement still needs supplier verification.
Troubleshooting Matrix: From Failure Symptom to Next Test
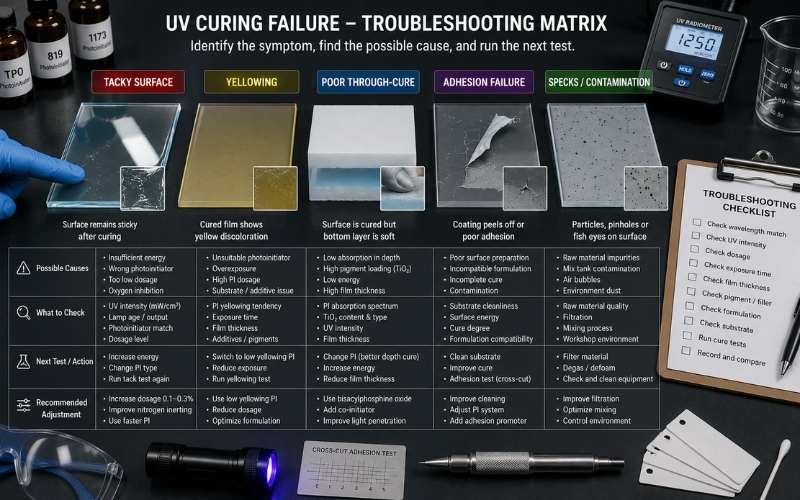
Table 6: UV Curing Failure Diagnosis
| Failure Symptom | What It Often Means | What I Check First | What Not To Do |
|---|---|---|---|
| Surface stays tacky | Surface cure or oxygen inhibition | Lamp dose, PI level, amine package | Do not raise PI blindly |
| Bottom stays soft | Poor through-cure | Film thickness, pigment, 819/TPO direction | Do not approve based on surface only |
| Yellowing after cure | Overdose, PI type, resin issue | PI type, UV dose, resin color | Do not blame one raw material first |
| Strong odor | Residual PI or poor conversion | Cure completeness and dosage | Do not ignore end-use market |
| Poor adhesion | Under-cure or substrate issue | Substrate, surface energy, cure depth | Do not change PI before checking substrate |
| Specks in coating | Solubility or dispersion issue | Dissolution method and filtration | Do not scale without filtration test |
| Slow line speed | Weak energy transfer | Lamp aging and PI absorption | Do not solve only by higher dosage |
One field lesson: in one white ink project, the buyer wanted to raise photoinitiator dosage because the ink surface looked dry but the lower layer stayed soft. The better first check was pigment blocking and wavelength match. More dosage would have increased surface screening and made the bottom cure worse.
Sample Testing Protocol Before Bulk Order
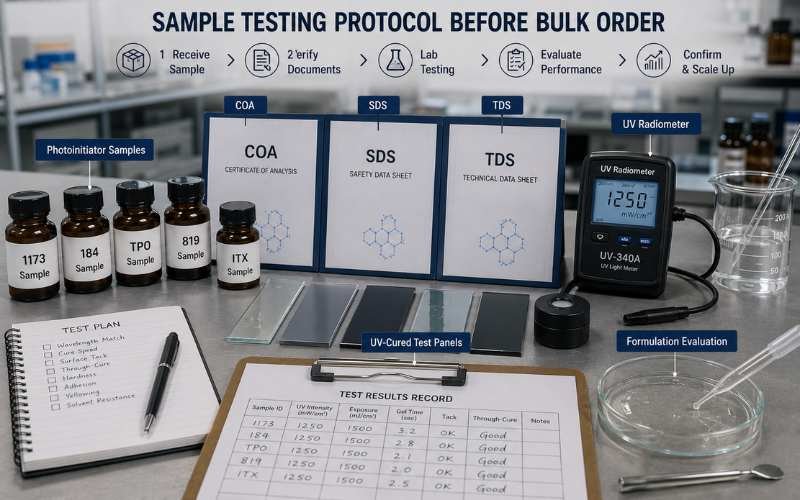
Before buying full drums or cartons, run a simple screening test. This does not need to be complicated, but it must use the real curing conditions.
Table 7: Lab Screening Plan for Photoinitiator Samples
| Test Item | Recommended Method | Why It Matters |
|---|---|---|
| Dosage ladder | Test low / middle / high loading | Finds the useful range |
| Real lamp | Use production wavelength | Avoids false lab results |
| Real substrate | Test on actual film, paper, plastic, metal, or glass | Checks adhesion and cure |
| Real thickness | Match production coating or ink layer | Confirms through-cure |
| Surface tack | Finger tack or formal tack test | Checks handling |
| Hardness | Pencil hardness or customer method | Checks coating performance |
| Solvent resistance | MEK rub or internal standard | Shows cure completeness |
| Adhesion | Cross-hatch or peel test | Confirms substrate bonding |
| Aging check | Heat/light exposure if needed | Checks yellowing and stability |
For a small buyer, this testing protects cash. For a large factory, it protects production continuity.
The Real Cost of Choosing the Wrong Photoinitiator
Photoinitiator cost is not only price per kilogram. The real cost is total curing cost.
Table 8: Photoinitiator TCO Checklist
| Cost Area | What To Check | Why It Matters |
|---|---|---|
| Dosage | Effective cure at lowest stable loading | Controls formula cost |
| Cure speed | Conveyor speed or exposure time | Affects output per shift |
| Failed batch risk | Lab validation before bulk order | Prevents waste |
| Compliance | SDS, COA, REACH/RoHS support | Reduces export delay |
| Supply | MOQ, lead time, batch continuity | Protects repeat production |
| Handling | Powder vs liquid | Affects mixing and filtration |
| Storage | Shelf life and packaging | Reduces aging risk |
| Customs | Correct documents and HS details | Avoids clearance problems |
If a supplier cannot provide documents quickly, your purchasing risk rises. If batch quality changes, your R&D approval may become useless. If MOQ is too high for trial orders, your inventory risk increases.
This is why a serious buyer should choose a photoinitiator supplier based on technical fit, documentation, lead time, and batch continuity, not price alone.
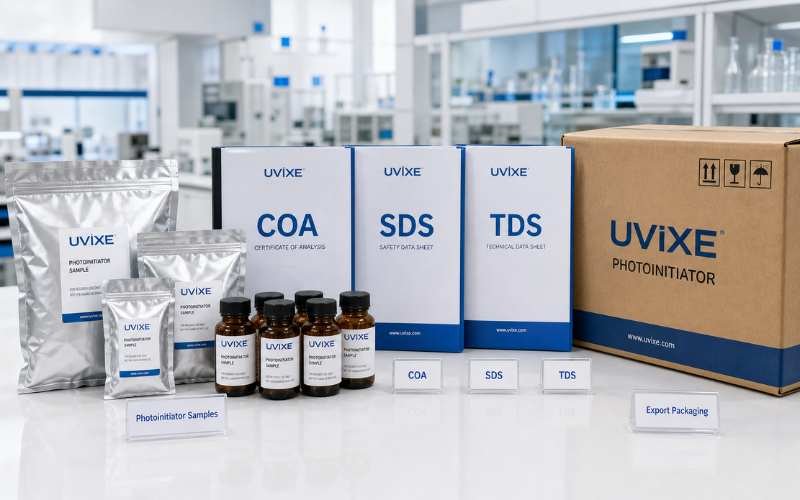
What Documents Should You Request From a Photoinitiator Supplier?
Before bulk order, request the documents that your lab, warehouse, customs broker, and end customer may need.
Ask for:
- COA for batch quality
- SDS for safety and customs
- TDS for use guidance
- CAS number confirmation
- Purity information
- REACH/RoHS support when needed
- Packaging specification
- Shelf life and storage condition
- Sample availability
- MOQ and lead time
- Export document support
For EU-facing buyers, also check the regulatory status of specific substances. For example, the ECHA substance search for TPO is a useful starting point when reviewing compliance risk.
UVIXE Photoinitiator Product Directions
UVIXE supplies industrial photoinitiators for UV coating, UV ink, UV adhesive, and 3D printing resin manufacturers. Our main products include 1173, 184, TPO, TPO-L, 819/BAPO, ITX, DETX, 907, and 369.
Table 9: Common UVIXE Photoinitiator Directions
| Photoinitiator | Practical Role | Common Application Direction |
|---|---|---|
| 1173 | Fast radical generation, clear systems | UV coatings, adhesives, varnishes |
| 184 | Good reactivity and surface cure | Coatings, inks, adhesives |
| TPO | Long-wavelength absorption | UV LED, coatings, inks, resins |
| TPO-L | Liquid form and lower-yellowing direction | LED-curing systems, clear formulas |
| 819 / BAPO | Deep cure and pigmented systems | White inks, thick films, 3D resins |
| ITX | Type II sensitizer direction | UV inks and pigmented systems |
| DETX | Sensitizer direction | Inks and coating blends |
| 907 | Surface cure support | UV inks and pigmented systems |
| 369 | High reactivity direction | Inks and specialty UV systems |
If your team compares liquid and solid phosphine oxide options, read our guide on TPO vs TPO-L photoinitiator. If your problem is deep cure in white ink or thick resin, compare TPO vs 819 photoinitiator before sample testing.
FAQ
What is the main function of a photoinitiator?
The main function of a photoinitiator is to start polymerization under UV or visible light. It absorbs light, creates radicals or cationic species, and turns liquid monomers and oligomers into a cured solid.
Can UV resin cure without a photoinitiator?
Most UV-curable acrylate resins cannot cure fast enough without a photoinitiator. They need a photoinitiator to start rapid polymerization. EB curing is different because electron beam energy can initiate reactions without the same photoinitiator package.
Is more photoinitiator always better?
No. More photoinitiator can increase cure speed only when the system is under-dosed. Too much photoinitiator can block light, reduce through-cure, increase yellowing, raise odor, and add cost.
Which photoinitiator is best for UV LED curing?
The best photoinitiator for UV LED curing depends on LED wavelength, resin type, film thickness, pigment loading, and compliance target. TPO, TPO-L, and 819 are common directions for 385 nm, 395 nm, and 405 nm systems, but the absorption spectrum must match the lamp.
Why does my UV coating stay tacky?
A UV coating may stay tacky because of oxygen inhibition, low photoinitiator dosage, poor wavelength match, low UV dose, wrong resin balance, or poor surface-cure package. Start by checking lamp output, film thickness, and photoinitiator absorption.
What photoinitiator should I use for white UV ink?
White UV ink often needs a deep-cure photoinitiator because titanium dioxide blocks and scatters UV light. TPO, 819/BAPO, or suitable blends are common starting directions. Final selection must be tested in the real ink formula.
What is the difference between a photoinitiator and a photosensitizer?
A photoinitiator directly starts the curing reaction by creating radicals or cationic species. A photosensitizer absorbs light and transfers energy or supports another initiator system. ITX and DETX often work as sensitizer directions in UV ink packages.
What should I send to a supplier before asking for a quote?
Send your application, lamp type, wavelength, resin system, film thickness, pigment loading, current curing problem, target market, and expected order quantity. This allows the supplier to suggest realistic sample grades instead of only quoting a random product.
Make the Photoinitiator Work for Your Line
A photoinitiator does more than start a chemical reaction. It decides whether your UV system cures fast, dries cleanly, reaches the bottom of the film, keeps color stable, and passes customer testing.
For procurement managers and R&D buyers, the lesson is direct: do not buy photoinitiators by CAS number and price only. Match the product to your lamp, resin, pigment, thickness, end-use market, and document requirements.
A better match can reduce dosage, improve line speed, lower failed-batch risk, and protect repeat production.
Send Your UV System Details Before You Buy
If you are developing or adjusting a UV coating, UV ink, UV adhesive, or 3D printing resin, send UVIXE your system details before placing a bulk order.
Please include:
- Application: coating, ink, adhesive, or 3D printing resin
- UV source: mercury lamp, 365 nm, 385 nm, 395 nm, or 405 nm LED
- Film thickness or bondline thickness
- Resin type
- Pigment or filler loading
- Current photoinitiator and dosage
- Current cure problem
- Target market: EU, Middle East, India, Southeast Asia, or other region
- Required documents: COA, SDS, TDS, REACH/RoHS support
- Sample quantity and expected bulk volume
UVIXE can suggest 1–3 starting photoinitiator grades for lab screening and support qualified B2B buyers with 100–500 g samples, COA, SDS, TDS, FOB China quotation, MOQ information, and lead time.